


Super Kaos from Lazerworks Short Kit.
 06-12-2019, 03:44 PM
#101
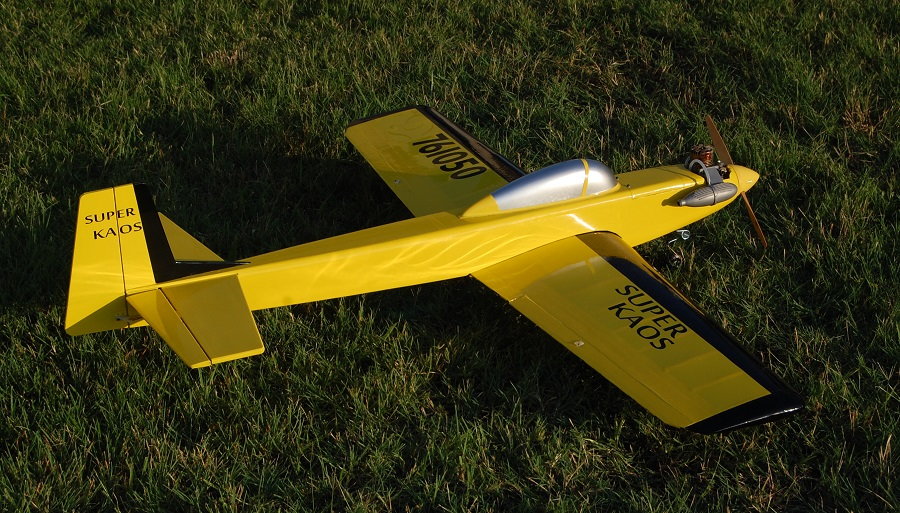
That's one sweet looking canopy Matt. I guess the front hatch kept you from moving it any further forward. I like'm up front a bit more to help with KE performance. Turtle decks help a little too but then you kinda lose that vintage pattern look. Looking forward to seeing a maiden vid. Even better, a vid once she's trimmed in!
Did the spinner get some of that high dollar paint too?
Did the spinner get some of that high dollar paint too?
Last edited by Glowgeek; 06-12-2019 at 03:50 PM.
 06-12-2019, 05:14 PM
#102

My Feedback: (2)
Hi Matt, Today I started my day off at the local water park with my wife and son slide down a very cold water slide and then it start pouring down rain and I just got colder! It took me a half day to warm up from that adventure but it was wellworth it as my son was so excited to finally get to go to the water park! Wow that looks really cool and am working on my TH Kaos ARF tonight and I have a canopy that is glued and screwed down the top of the fuse behind the firewall. I wanted to get a pilot and build a small Balsa console and then cover the interior of it with black covering and glue the pilot to the fuse. But I might do your technique instead and paint it black! I didn't mean to hijack your build as it looks fantastic Matt!
Thank You
Michael Johnston.
Thank You
Michael Johnston.
Last edited by mkjohnston; 06-12-2019 at 05:16 PM.
06-12-2019, 08:01 PM
#103
Thread Starter

That's one sweet looking canopy Matt. I guess the front hatch kept you from moving it any further forward. I like'm up front a bit more to help with KE performance. Turtle decks help a little too but then you kinda lose that vintage pattern look. Looking forward to seeing a maiden vid. Even better, a vid once she's trimmed in!
Did the spinner get some of that high dollar paint too?
Did the spinner get some of that high dollar paint too?
06-13-2019, 07:10 AM
#106
Thread Starter
Michael, black and silver seem to be common colors for painting the inside of canopies but I have also seen it done in colors that are complimentary to the paint scheme. As long as you get a bead of glue around the base of the canopy the paint on the inside doesn't have to be fuel proof.
06-13-2019, 09:49 AM
#107
My Feedback: (2)
HI Matt, Did you say you used regular Testors model paint to paint your canopy? I want to paint my black and use my new high dollar air brush that I got last year. Does Testors have a thinner where I can thin out the black to spray it. I also have model car body mask and I could mask out the frame like you did! cool! ttl Michael
06-13-2019, 02:17 PM
#108
Thread Starter
HI Matt, Did you say you used regular Testors model paint to paint your canopy? I want to paint my black and use my new high dollar air brush that I got last year. Does Testors have a thinner where I can thin out the black to spray it. I also have model car body mask and I could mask out the frame like you did! cool! ttl Michael
06-13-2019, 03:26 PM
#109
Matt, just wanted to take a minute and thank you for this build thread, your building tenacity and your thorough method of depicting the build. Many build threads like this end suddenly when the project is very near completion leaving the readers with a dry taste in their mouths and a guess how things turned out.
Lonnie
PS: Are those Astro Hogs in the background of your pics?
Lonnie
PS: Are those Astro Hogs in the background of your pics?
Last edited by Glowgeek; 06-13-2019 at 03:29 PM.
06-13-2019, 06:15 PM
#110
Thread Starter
Matt, just wanted to take a minute and thank you for this build thread, your building tenacity and your thorough method of depicting the build. Many build threads like this end suddenly when the project is very near completion leaving the readers with a dry taste in their mouths and a guess how things turned out.
Lonnie
PS: Are those Astro Hogs in the background of your pics?
Lonnie
PS: Are those Astro Hogs in the background of your pics?
Airplanes in the background: No Astro Hogs although I've always wanted one. The airplanes in the corner are a BUSA N-17 and a BUSA Sopwith Camel. The airplanes under the table are an Aristocraft Staggerwing and a GS Stinson SR-6 Reliant. The Camel and Reliant are currently under construction. The N-17 needs minor repairs and the Staggerwing is on the disabled list.
06-18-2019, 06:41 PM
#111
Thread Starter
Well, its all done but tuning the engine and the maiden flight. A last detail was having to inlet the switch plate into the side of the fuselage about a 1/16 of an inch. The toggle on the switch didn't quite reach all the way through the fuselage side. All in all this has been a pleasant build. Although I didn't make any particular effort at building light my airplane came out at exactly the weight advertised in the build article, 6 1/4 pounds. That's roughly 2840 grams for those of you who live in metric land. As with any short kit you do have to round up the standard size sheet stock and sticks. The short kit from Lazer-Works was of high quality with excellent parts fit. Although there is more carving and sanding than on a stick type airplane, if you can build a four channel kit you can probably build a Super Kaos. The maiden depends on how well the engine tunes up and the weather conditions. It is supposed to hit 100 degrees F later this week but we are also still in the North Texas storm season.
06-19-2019, 12:05 AM
#112
Matt, congratulations on a fine thread and your Super Kaos. You should be very proud of your accomplishments, it really is a stunning plane! Good luck on your maiden and enjoy the fruits of your labor...
I know I can speak for all that have followed , that we look forward to an upcoming video and a favorable flight report! So what's next???lol
I know I can speak for all that have followed , that we look forward to an upcoming video and a favorable flight report! So what's next???lol
Last edited by VincentJ; 06-19-2019 at 12:09 AM.
06-19-2019, 04:22 AM
#113
She's a beauty Matt! Straight build and the covering looks good too. Doubtful you'll need more than a couple of clicks of trim to fly straight and level. With the Fox .60 and 6.25 lbs. vert should be unlimited or very near to it with an 11x7 or 12x6.
A few questions please.
What is the prop size and peak rpm?
Where is your cg for maiden?
Maybe a pic of avionics with wing off?
A few questions please.
What is the prop size and peak rpm?
Where is your cg for maiden?
Maybe a pic of avionics with wing off?
Last edited by Glowgeek; 06-19-2019 at 04:40 AM.
06-19-2019, 07:07 AM
#114
Thread Starter
Matt, congratulations on a fine thread and your Super Kaos. You should be very proud of your accomplishments, it really is a stunning plane! Good luck on your maiden and enjoy the fruits of your labor...
I know I can speak for all that have followed , that we look forward to an upcoming video and a favorable flight report! So what's next???lol
I know I can speak for all that have followed , that we look forward to an upcoming video and a favorable flight report! So what's next???lol
I have an old kit of a Stinson SR-6 that I need to finish panting and a BUSA 1/4 scale Camel that is framed up and needs to be finished. In terns of build threads I want to get back to my Pfalz D-IIIa. I'm up to about the third design on the landing gear and then on to cutting wing ribs.
06-19-2019, 07:56 AM
#115
Thread Starter
She's a beauty Matt! Straight build and the covering looks good too. Doubtful you'll need more than a couple of clicks of trim to fly straight and level. With the Fox .60 and 6.25 lbs. vert should be unlimited or very near to it with an 11x7 or 12x6.
A few questions please.
What is the prop size and peak rpm?
Where is your cg for maiden?
Maybe a pic of avionics with wing off?
A few questions please.
What is the prop size and peak rpm?
Where is your cg for maiden?
Maybe a pic of avionics with wing off?
06-19-2019, 12:32 PM
#116
Thread Starter
A couple of views of the guts of the thing. The wiring still needs to be tidied up but everything is pretty much where it is going to be. I know that some folks have strong feelings about the Orange receivers but I've had good luck with them. I have used at least one satellite receiver in all of my nitro models and where there is room I have gone with a 6V battery. In this particular plane I'm using two satellites.


As an aside I found a neat product for tinting epoxy. I picked up some "alcohol ink" at Michael's. A few drops is enough to tint a batch of 5 min epoxy. Some colors are more intense. For instance one drop of red will tint as much epoxy as four drops of yellow. Plain epoxy will be translucent while adding microballoons or other filler will make it opaque.

As an aside I found a neat product for tinting epoxy. I picked up some "alcohol ink" at Michael's. A few drops is enough to tint a batch of 5 min epoxy. Some colors are more intense. For instance one drop of red will tint as much epoxy as four drops of yellow. Plain epoxy will be translucent while adding microballoons or other filler will make it opaque.
06-19-2019, 04:32 PM
#117
Great tip on the alcohol ink, I'll have to give that a try. Thanks.
I have orange RX's in 2 of my planes, no satellites and no problems with full range reception. They are at times slow to connect to a couple of my JR radios and occasionally wig out when initially connecting. They work very well with my Spectrum radios.
My 6 Lemon RX's bind and connect very quicly and flawlessly. Again, no satellites and no problem with full range reception.
I've only had 2 failures with RX's ever, both JR's. One dead RX and one dead Satellite RX.
Tie up the wires? Am I supposed to do that?
Last edited by Glowgeek; 06-19-2019 at 04:36 PM.
06-25-2019, 08:14 AM
#118
Thread Starter
A successful maiden flight as occurred. I took the Super Kaos out to the field last night for the local club's Monday night flying session. There were a couple of minor squawks. The set screw on the nose gear needed tightening and the screw holding the rudder ball link to the servo arm was dragging on top of the servo. That second item is a good reason for opening up an airplane after the maiden flight. Sometimes thing don't show up until you put a little load on the parts. I still need to do a bit of tuning on the engine. It's running a bit rich but aside from the mess that is probably a good thing during the first flight. We were supposed to have a wind straight down the runway but how often does that actually happen? The airplane broke ground quickly as it came up to speed. It weathervaned a little bit into the cross wind but it was easily manageable. The airplane climbed out with authority. The first few minutes were spent just flying around the field. Very little trim was needed. I did a little bit of light aerobatics. Loops were nice with no noticeable tendency to roll through the loop. Rolls were crisp and axial but perhaps a little slow. I still have room to add more aileron throw. The airplane has good neutral stability. I was able to let go the sticks and fly the length of the field at 3/4 throttle. Inverted flight needed a little bit of forward stick. At this point the airplane is a little nose heavy, okay for a maiden flight but I really had to work a bit to get it to stall. Even though I have substantial rudder deflection it tended to drop the nose when I tried a knife edge. Before I do anything else to the balance I can trade places with the battery and receiver. The airplane carries speed well but does noticeably decelerate at idle. Despite a little bit of cross wind the approach for landing was stable and predicable. I think if I had carried just a smidge more rpms, it would have flared better. Lots of practice and tuning ahead as I intend to try my hand at flying a Senior Pattern Association in a couple of months. The Super Kaos is really a pretty straightforward build. There is some sanding and carving involved but that is one of the things that sets the Super Kaos apart from some of the boxier looking airplanes. Being a short kit, it does require that you source your own hardware and stock sized wood. I tend to see this as an advantage as it allows me to use good quality hardware and to pick my wood according to weight or hardness. If you have done any other low wing aerobatic kit you shouldn't have too much trouble with the Super Kaos. If you are interested you can contact Eddie at Lazer Works - Engraving & Design. There is a short maiden flight video on the Balsa Model Aircraft Builders Association page on Facebook.
06-25-2019, 12:17 PM
#120
Thanks for the details Matt. No surprises on maiden is always a good thing. A testimony to your building chops!
BTW, that group on facebook is closed to non members.
BTW, that group on facebook is closed to non members.
Last edited by Glowgeek; 06-25-2019 at 03:44 PM.
06-25-2019, 06:23 PM
#121
Thread Starter
Oops, sorry about the facebook issue. I've posed it to my timeline, search for Matt Kirk. It should be public.
06-26-2019, 07:27 AM
#122
Thread Starter
I put in flight number three last night. I had snugged up the set screw on the nose gear and moved the battery pack back to the aft end of the radio compartment, next to the servos. The Fox Eagle IV is a bit of a heavy weight as .60 size engines go. I may eventually have to add a little weight back at the tail to get the CG fully back to the point shown on the plans. It won't be much if I do. Just shifting the battery made for a significant improvement in the knife edge. If one is using a lighter engine such as an O.S. or similar, the balance should come out near to perfect. I wouldn't have any great concern over putting in a modern 4-stroke. The biggest difficulty would be extending the nose a bit to cover the nose of the engine. Even after adjusting the CG the stall is really benign. This leads to a thing to be careful of on landing approach. At low idle the prop acts as an airbrake and the airplane will slow down more quickly than expected. A few clicks above dead slow gets right to the sweet spot for final approach.
06-30-2019, 07:53 AM
#124
Thread Starter
Thanks Michael, Once you get used to the new shift you may have to start flying after work Dawn Patrols.
A little bit of tweaking continues. The first few flight were intended to be relatively conservative and I used a 12-6 prop and left the engine running a tad rich. During the last outing I switched to an 11-7.5 as recommended on the plans. I also leaned the carb until the engine was just breaking into a clean two stroke at full throttle. Huge difference. It really wakes the airplane up in terms of top end speed and in vertical performance. Idle speed on the engine is about the same but it doesn't bleed off speed as quickly as with the 12-6 prop. Even at dead idle the airplane floats more on landing so I will have to set up for landing a little farther out. As an aside on the engine, one of our local club members who is an active pattern flier commented that back in the day they all had a "Fox in the box", indicated that they all had a Fox motor on hand but that they couldn't get them to run well enough to be competitive. The story I have always heard is that the needle valve threads were to coarse to allow for the engine to be properly adjusted. I have one of those carburetors and the main needle valve does look like it could have been made in a blacksmith shop. I'm running a later/different air bleed carb that has a much finer thread on the main needle valve. I haven't gotten a new tach yet but it seem to run reliably across the entire power band and pulls in to the vertical with no problems. There may be a little room to scootch the CoG back just a little more but I have got it to the point where the airplane spins a little more easily than it did on the first couple of flights. It will flat spin but may need a little more throw on the elevator. It will stop flat spinning after about a full turn if you just let go the controls but stops immediately if you just tap the rudder. Ordinary spins continue for about a half turn after releasing the controls. I expect that I will need to get our experienced pattern flier to take it up to get a few pointers on further trimming.
A little bit of tweaking continues. The first few flight were intended to be relatively conservative and I used a 12-6 prop and left the engine running a tad rich. During the last outing I switched to an 11-7.5 as recommended on the plans. I also leaned the carb until the engine was just breaking into a clean two stroke at full throttle. Huge difference. It really wakes the airplane up in terms of top end speed and in vertical performance. Idle speed on the engine is about the same but it doesn't bleed off speed as quickly as with the 12-6 prop. Even at dead idle the airplane floats more on landing so I will have to set up for landing a little farther out. As an aside on the engine, one of our local club members who is an active pattern flier commented that back in the day they all had a "Fox in the box", indicated that they all had a Fox motor on hand but that they couldn't get them to run well enough to be competitive. The story I have always heard is that the needle valve threads were to coarse to allow for the engine to be properly adjusted. I have one of those carburetors and the main needle valve does look like it could have been made in a blacksmith shop. I'm running a later/different air bleed carb that has a much finer thread on the main needle valve. I haven't gotten a new tach yet but it seem to run reliably across the entire power band and pulls in to the vertical with no problems. There may be a little room to scootch the CoG back just a little more but I have got it to the point where the airplane spins a little more easily than it did on the first couple of flights. It will flat spin but may need a little more throw on the elevator. It will stop flat spinning after about a full turn if you just let go the controls but stops immediately if you just tap the rudder. Ordinary spins continue for about a half turn after releasing the controls. I expect that I will need to get our experienced pattern flier to take it up to get a few pointers on further trimming.
06-30-2019, 02:38 PM
#125
Sounds like a great day at the field. You may already have one or more of these trimming charts but I thought I'd just post them anyway. One of the keys to smoothing your sequence is to use rudder for corrections whenever possible. It is much more difficult for judges to see a line correction using yaw than using roll. This becomes even more important when the wind picks up. Like trying to track on line in a loop with crosswind.
Nose heavy planes fly smoother than ones balanced closer to the neutral point. No need to push the cg back very far. Some elev push for level inverted flight and a tiny (or no) elev push for inverted 45� upline is far enough back to take you through at least advanced class.
Practice smooth shallow climb outs on take off until you leave the box. Judges will dock you for yanking it off the runway. You need to be able to grease your landings consistently. Use only rudder for cross wind line ups down the runway. Side slip that baby right down the middle! Point is, MANY people lose points on take offs and landings and what would otherwise have been a podium finish ends in up less than desirable.
Throws should be adjusted just beyond what is required to perform the maneuvers, especially the ailerons.
Enter spins in whichever direction that the first wing stalls and drops. Judges will dock you for forcing the spin direction, especially when using ailerons to do so.
And of course all maneuvers need to start and end at the same altitude and distance from the judges.
Oh, and don't forget to call takeoff, entry and exit from the box and landing. I've blown those a few times.
Have a caller too. I was amazed that my mind went absolutely blank at my first SPA event.
Sorry, I got on a roll....lol
It's been years since there's been much interest in pattern contests around here. Unfortunate, it's the most fun I've had flying rc. I still wipe the dust off Kwik Fli III and wring out the 55AX at the field once in while. Good times!
Last edited by Glowgeek; 06-30-2019 at 04:08 PM.